|
|
How to replace/reseat CPU in a laptop (Viglen Dossier NS+/Clevo M22ES/D27ES) |
Searching on information on this subject came up with nothing! So am doing this in the hope that it will help someone, if you find it useful and/or interesting, drop Me a mail, or post on the forums :)
Check the drivers area of the website for driver/utils/links for these machines, if they're not there, contact Me and I'll help you get sorted. I tried numerous BIOS's in here (from multiple manufacturers) and crashing problem remained. (See below for how I DID fix the machine, it's running 100% stable now :) )
I had major problems with My laptop crashing, even installing windows was extremely difficult, I think this is caused by overheating issues, yes I could get a 'notebook cooler' but should I need to? The idea of a laptop is surely that you don't have peripherals of any kind that *need* to be connected? I've lost count of how many laptops I've seen with Intel CPUs that are overheating, Celerons don't seem to suffer from this issue, but then, would you really want a Celeron??? lol
Performing a search in Google shows up that this problem is very widespread, on many different manufacturers of notebooks.
If only the BIOS wasn't a 'cut down' version, then I would have control over the clockspeed, and I'm sure lowering this would resolve the issues I am experiencing. Also some motherboard monitoring would be nice, So we could actually SEE the temperatures and figure out the problem easier, but perhaps this is done on purpose so we DON'T see what's going on here.
Anyway, I decided that perhaps I should check the CPU, see if it could be replaced, and then maybe look for a different chip that will run cooler, in the meantime, at least I could clean up the CPU/Cooling circuits.
We cannot be held responsible for any damage caused by using the process described here, if you're not sure what you're doing, don't do it! I had no problems, but then I also have many many years of experience. I've now done this whole procedure twice, once to check the CPU, and again to replace the CPU.
Click thumbnails to enlarge images ;)
Notebook: Viglen Dossier NS+ 1.8GhZ Intel Pentium 4 (Label says D27ES)
Motherboard: Clevo M22ES
Added 15th June 2005: Replaced the processor yesterday and noticed some weird things... Voltage on the 1.8P4 chip was stated at 1.75v, board is rated at max CPU voltage as 1.52v. I'm gonna guess that it's the voltage not being enough to power the 1.8P4. I've now put in a Celeron 2.3 chip (1.5v)... Yeah I know, it's a celeron, but at least I've proved where the problem lies. Am looking more into this and will add when I have more information. In the meantime I'd appreciate if you can all post on the forum with your specifications, in particular the processor speed (and voltage if known). Thanks... Steve!
1. On this notebook the first thing you should do is remove the keyboard, this is done by levering out the clips along the back row of the keyboard, then lifting the keyboard away from the main chassis, carefully disconnecting the ribbon cable. (See picture on section 2, ribbon cable in lower left corner).

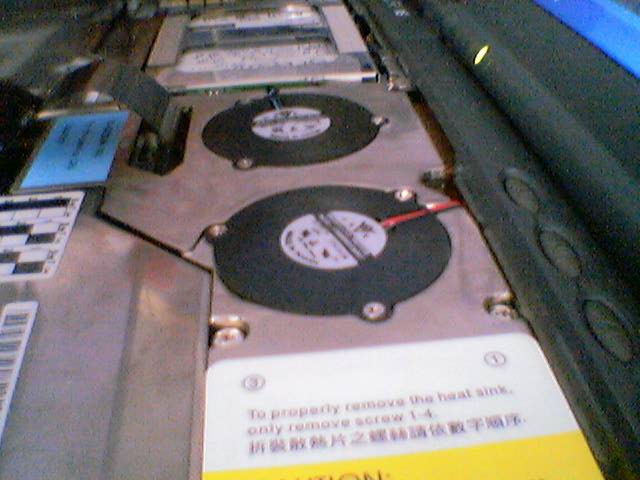
2. You will notice two fans, unscrew the 3 screws in each, and carefully lift them, there is no need to disconnect the connecting cables as long as you are careful not to damage the fan or associated wiring.

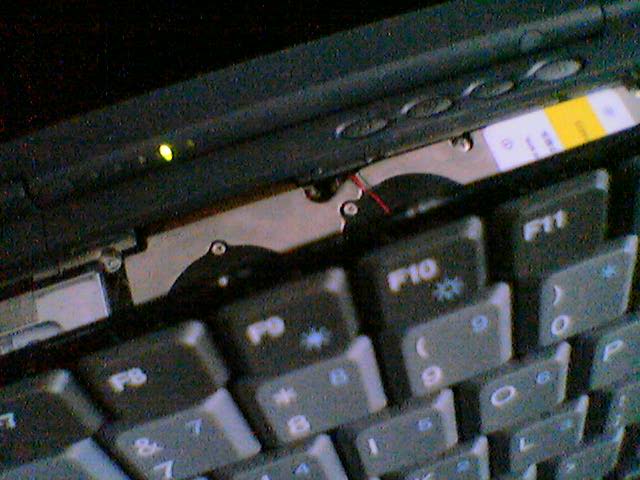
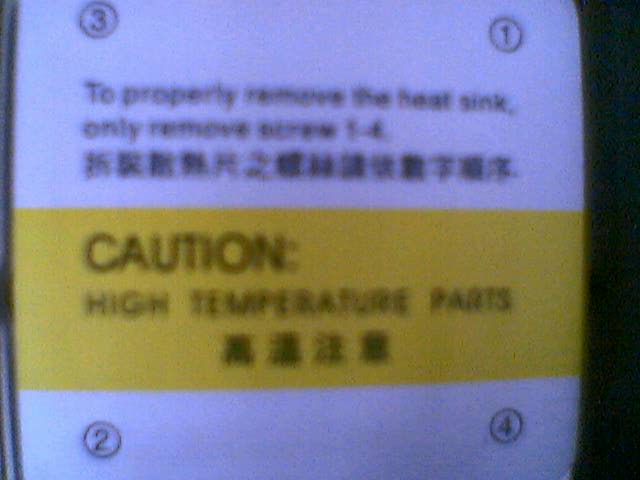
3. Look to the far back right of the notebook and you'll notice a label saying 'Caution', underneath this is the CPU, take note that there are four screws labelled 1,2,3 and 4, these should be carefully unscrewed in order 1,2,3 and then 4, this is so that the heatsink (Cos that's what you're busy unscrewing) comes away from the CPU evenly. The screws are spring mounted.
4. Carefully remove the entire metal area (including the area where the 2 fans were mounted), lifting as evenly as possible.
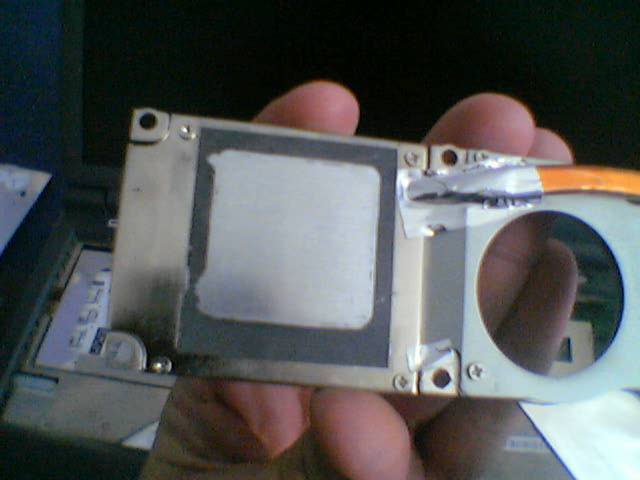
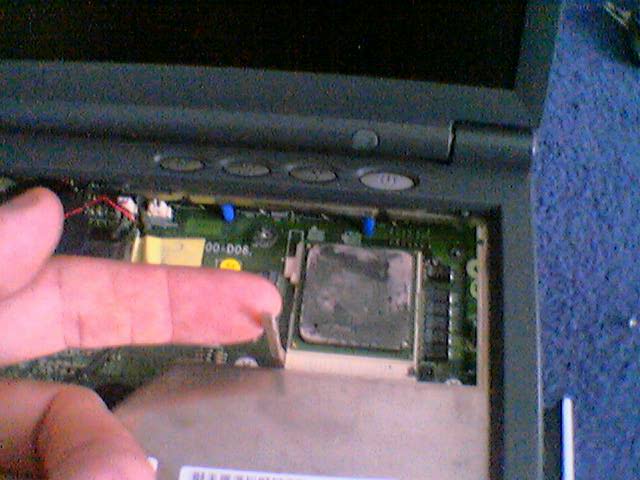
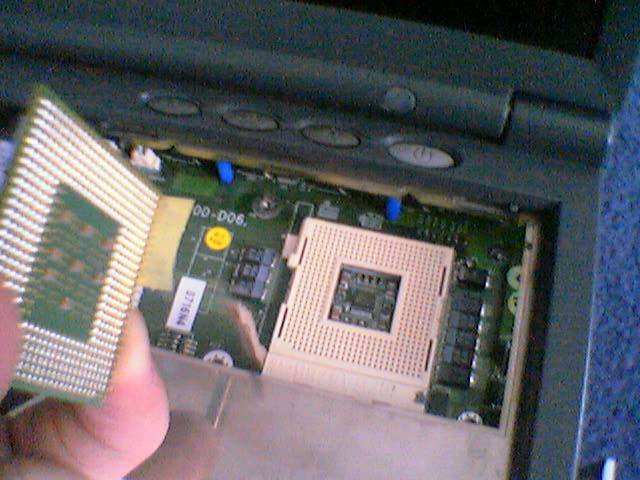
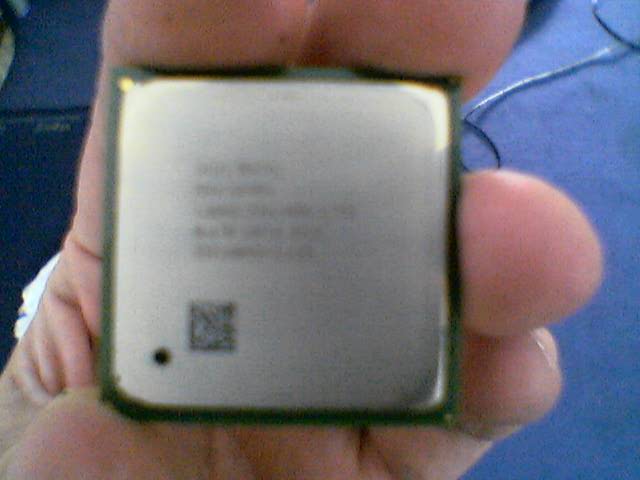
5. Now you will see the CPU and notice that it is similarly mounted to a desktop machine, this model is a desktop P4. Am not sure if I like the way the heat sink compound seems patchy on this, I'm going to clean it and apply new heat sink compound. Removing the CPU is easy, as is fitting a new CPU, simply pull back the lever carefully and extract the CPU straight up. You don't want to bend the pins on your chip, so go easy and take your time if needed. Note that there is only ONE way around that the CPU can be fitted, this is marked on the chip surface, and you will notice a 'missing pin' underneath.
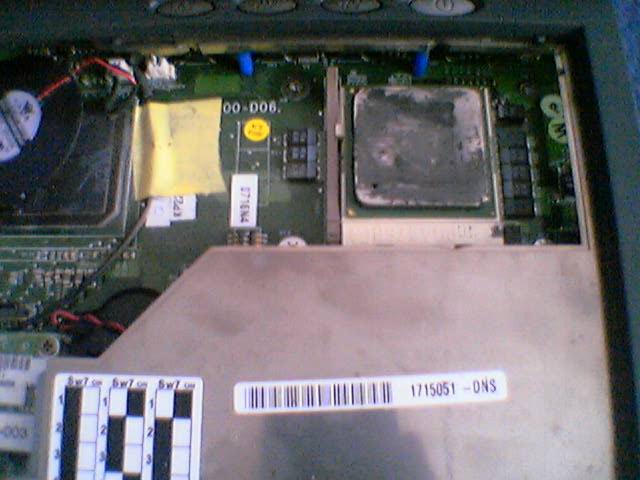
6. Ensure that both the CPU and the area of the heatsink where the CPU will connect is clean, as even the smallest dust particle would affect heat dissipation away from the CPU. I applied a very thin (paper thin) covering of paste onto the heatsink itself, ensure that this is as smooth as possible.
7. Carefully replace the heatsink, placing it flatly back in place, you want the heatsink area to be steady and *exactly* in place, hold this carefully, and replace screws 1,2,3 and 4. I screwed them in in that order, maybe I should have done this in order 4,3,2 and then 1? Either way should work :)
8. Replace fans, note that there is a gap where the wires feed, so although not important, your fan will be the same orientation as it was before disassembly.

9. Replace the keyboard, Pull the connector hinge up slightly, pushing in the ribbon cable at the same time, and then locking the connector in place by pushing down on both sides at the same time (also pushing cable down). Replace keyboard in reverse of disassembly, i.e lock in the front first, sliding it from the back, and then push down on the areas where the clips are to lock it in place.
10. Power up laptop :)
Well, as I stated, I removed and refitted the CPU in this unit, I then used the notebook for a while, with no problems :) I then decided to stress test the unit, and within minutes, it had crashed and was rebooting, so... it seems that either I need a cooler CPU in here, or that perhaps the heat is coming from somewhere else? Inside the machine doesn't seem overly hot in any area, even the CPU area, though when the fans kick in there's some fairly hot air getting pumped out of the grills. Perhaps the hard drive is the issue here, although checking SMART status of the drive seems fine. Guess it's gonna cost Me money and time to replace the CPU and maybe the HD, it's unlikely that anything else is causing the problem.
Board in this notebook (Clevo M22ES Rev. A) can take up to a 3GhZ CPU apparently, but whether they run any cooler is something I'll have to research further, I'm also unsure as to whether the cooling circuit would suffice or whether this would also need replacing?
I've tried various versions of the BIOS in here, and it seems more stable with version 7, version 8 seemed to crash more regular for some reason.
Sunday May 22 2005